
Mazda CX-5 Service & Repair Manual: Audio Unit (With Color LCD)
NOTE:
-
“iPod” is a registered trademark of Apple Inc. in the United States and other countries.
Purpose
-
The audio unit controls the CD, radio, exterior input devices (AUX/USB/iPod) and the display.
Function
-
Records the following items which the user has set.
|
Item |
Specification |
|
|
Preset memory |
AM |
6 |
|
FM1 |
6 |
|
|
FM2 |
6 |
|
|
SIRIUS (SAT1) |
6 |
|
|
SIRIUS (SAT2) |
6 |
|
|
SIRIUS (SAT3) |
6 |
|
-
The imbedded touch panel type display in the audio unit displays music information for CD and radio, and it also displays rear mount camera images and the navigation screen.
-
The audio unit has the following functions:
USB/iPod applicable
-
A USB device such as USB memory or an iPod connected to the auxiliary jack/USB port can be controlled by the audio unit.
User personalization
-
By operating the display of the audio unit, the following personalization features can be set.
-
Door Locks Systems
-
Advanced keyless entry system
-
Auto Re-lock Time
-
Lock Beep Volume
-
Walk Away Lock
-
Keyless entry system
-
Auto Re-lock Time
-
Unlock Mode (Without Touch Sensor)
-
Power door lock system
-
Auto Door Lock Mode
-
Lighting Systems
-
Turn light system
-
3-Flash Turn Signal
-
Auto light system
-
Auto-headlight On
-
Auto Light OFF System
-
Headlight Off Timer
-
Room Light Control System
-
Interior Light Timeout - Door Open
-
Interior Light Timeout - Door Closed
-
Wiper/Washer System
-
Rain Sensing Wipers
NOTE:
-
For details on each personalization feature, refer to personalization items for each system..
Specification
|
Item |
Specification |
||
|
Rated voltage |
(V) |
12 |
|
|
Frequency range |
AM |
(kHz) |
530—1,710 |
|
FM |
(MHz) |
87.75—107.9 |
|
|
Amplifier maximum output |
(W) |
With Bose ®: 264 (external audio amplifier) Without Bose®: 25?4 |
|
|
Output impedance |
(ohm) |
4 |
|
|
Display |
Size |
(inches) |
480?272 (5.8) |
|
Type |
TFT *(Thin Film Transistor): Full-color |
||
* Short for Thin Film Transistor Used a lot with color LCDs.
Construction
-
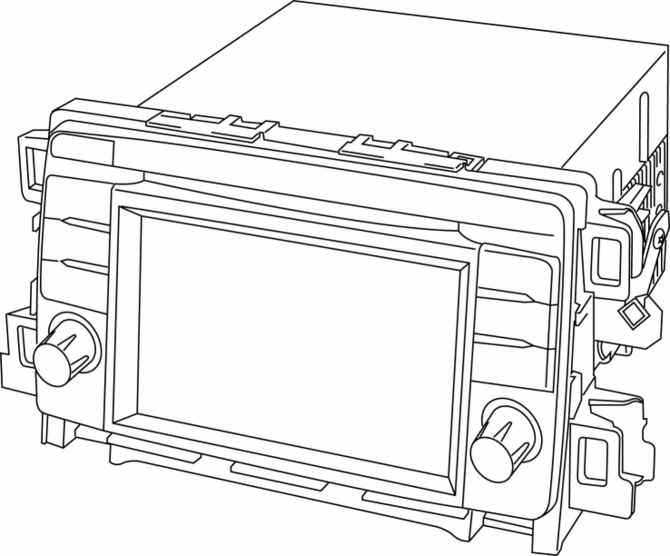
An audio unit with AM/FM tuner/MP3/WMA (Windows Media Audio)/AAC (Advanced Audio Coding) applicable CD player is assembled in the audio panel.
Terminal layout and signal
Audio unit
|
Terminal |
Signal |
|
|
|
1A |
Front door speaker LH (+) |
|
1B |
+B |
|
|
1C |
Front door speaker LH (-) |
|
|
1D |
Front door speaker RH (+) |
|
|
1E |
TNS (+) |
|
|
1F |
Front door speaker RH (-) |
|
|
1G |
TNS (–) |
|
|
1H |
Steering switch3 |
|
|
1I |
Vehicle speed signal |
|
|
1J |
Amplifier control *1 |
|
|
1K |
Parking brake signal |
|
|
1L |
— |
|
|
1M |
Reverse signal |
|
|
1N |
Steering switch1 |
|
|
1O |
CAN_H |
|
|
1P |
Steering switch2 |
|
|
1Q |
CAN_L |
|
|
1R |
ACC |
|
|
1S |
Rear door speaker LH (+) |
|
|
1T |
AudioPilot® control *1 |
|
|
1U |
Rear door speaker LH (-) |
|
|
1V |
Rear door speaker RH (+) |
|
|
1W |
Power ground |
|
|
1X |
Rear door speaker RH (-) |
|
|
|
2A |
Bluetooth voice input RH (+) |
|
2B |
Bluetooth voice input RH (-) |
|
|
2C |
Bluetooth voice input LH (+) |
|
|
2D |
Bluetooth voice input LH (-) |
|
|
2E |
AUDIO voice input RH (+) |
|
|
2F |
AUDIO voice input RH (-) |
|
|
2G |
AUDIO voice input LH (+) |
|
|
2H |
AUDIO voice input LH (-) |
|
|
2I |
HS-CAN (+) |
|
|
2J |
HS-CAN (-) |
|
|
2L |
Microphone voice input (+) |
|
|
2N |
Microphone voice input (-) |
|
|
2P |
Microphone ground |
|
|
2R |
Microphone power |
|
|
2T |
Microphone connection detection |
|
|
2V |
— |
|
|
2W |
AUX detect |
|
|
2X |
AUX signal LH,RH (-) |
|
|
2Y |
AUX signal RH (+) |
|
|
2Z |
AUX signal LH (+) |
|
|
2AA |
— |
|
|
2AB |
— |
|
|
2AC |
— |
|
|
2AD |
— |
|
|
|
3A |
— |
|
3B |
— |
|
|
3C |
— |
|
|
3D |
— |
|
|
3E |
— |
|
|
3F |
— |
|
|
3G |
— |
|
|
3H |
— |
|
|
|
4A |
USB power ground |
|
4B |
USB data (+) |
|
|
4C |
USB power supply |
|
|
4D |
USB data (-) |
|
|
|
5A |
USB power supply |
|
5B |
USB data (+) |
|
|
5C |
USB power ground |
|
|
5D |
USB data (-) |
|
|
|
6A |
Rear mount camera power supply *2 |
|
6B |
Rear mount camera ower ground*2 |
|
|
6C |
Rear mount camera image ground*2 |
|
|
6D |
Rear mount camera power signal input *2 |
|
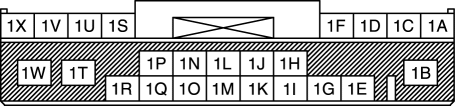
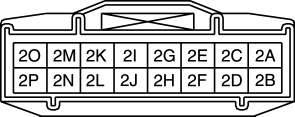
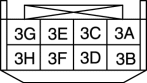


*1 With Bose®
*2 With rear mount camera
Antenna feeder connector
|
Terminal |
Signal |
|
|
|
7A |
ANT CONT |
|
7B |
Antenna |
|

Switch location
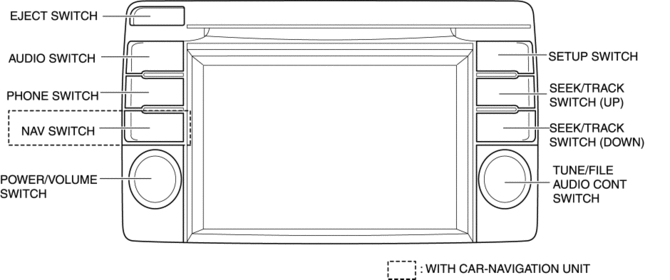
Operation
-
For the audio unit operation, refer to the AUDIO SYSTEM.
User personalization
-
When a panel switch on the audio unit is pressed, the system switches to SETUP mode.
-
When the vehicle button on the SETUP mode screen displayed in the audio unit display is pressed, the system names which can be set are displayed in the audio unit display.
-
The audio unit sends the personalization feature change information set by the user to the each control system (Start stop unit, rear body control module (RBCM)) via CAN communication.
-
When each control system (Start stop unit, rear body control module (RBCM)) receive the personalization feature change information, each personalization feature setting is changed according to the change information.
NOTE:
-
Refer to the Personalization Features for details on the method for setting the personalization features.
Fail-safe
-
Function not equipped.
 Audio System
NOTE:
“iPod” is a registered trademark of Apple Inc. in the United States and other
countries.
Outline
An audio unit compatible with AM/FM tuner and MP3/WMA (Windows Media ...
 Audio Unit (Without Color LCD)
NOTE:
“iPod” is a registered trademark of Apple Inc. in the United States and other
countries.
Outline
The audio unit controls the CD, radio, exterior input devices (AUX/US ...
Other materials:
Bsm Indicator Light Flashes While Not Under Bsm Indicator Light Flashing Conditions
(No Combination Switch Operation (Turn Signal Switch)) [Blind Spot Monitoring (Bsm)]
Description
BSM indicator light flashes while not under BSM indicator light-flashing
conditions (no combination switch operation (turn signal switch)
The BSM indicator light flashes despite not satisfying the BSM indicator
light flashing ...
Front Door Latch And Lock Actuator Inspection
The following actuator and switches are integrated with the front door latch
and lock actuator.
From the actuator/switch name and operation in the following table, select
the actuator or switch to be inspected, and perform the inspection following
the inspection procedure ...
Brake System/ABS Warning Light
Purpose/Function
The brake system/ABS warning light is built into the instrument cluster.
If a malfunction is detected in the system with the parking brake released,
the warning light illuminates to notify the driver.
Construction/Operation
When the DSC system and CAN l ...
