Mazda CX-5 Owners Manual: Audio Set (Type A)
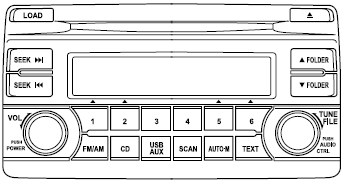
1 Power/Volume/Sound Controls
2 Operating the Radio
3 Operating the Compact Disc (CD) Player
4 How to use auxiliary jack/USB port
5 Error Indications
Power/Volume/Sound Controls
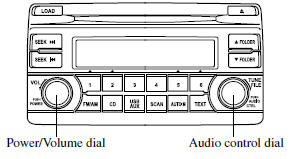
Power ON/OFF
Switch the ignition to ACC or ON. Press the power/volume dial to turn the audio system on. Press the power/volume dial again to turn the audio system off.
Volume adjustment
To adjust the volume, turn the power/ volume dial. Turn the power/volume dial to the right to increase volume, to the left to decrease it.
Audio sound adjustment
1. Press the audio control dial to select the function. The selected function will be indicated.
2. Turn the audio control dial to adjust the selected functions as follows:
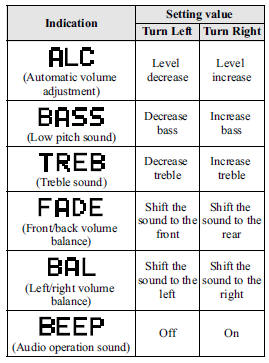
NOTE
About 5 seconds after selecting any mode, the volume function will be automatically selected.
To reset bass, treble, fade, and balance, press the audio control dial for 2 seconds. The unit will beep and “CLEAR” will be displayed.
Automatic Level Control (ALC)
The automatic level control (ALC) changes the audio volume automatically according to the vehicle speed. The faster the vehicle speed, the higher the volume increases. ALC has ALC OFF and ALC LEVEL 1 to 7 modes. At ALC LEVEL 7, the amount that the volume can increase is at the maximum. Select the mode according to the driving conditions.
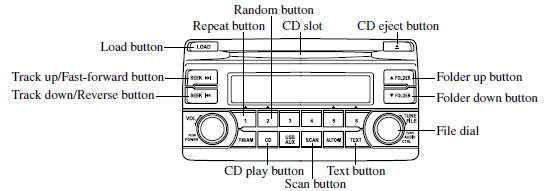
Operating the Radio
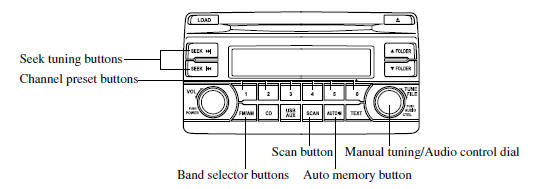
Radio ON
Press a band selector button (  ) to
) to
turn the radio on.
Band selection
Successively pressing the band selector button (
) switches the bands as follows: FM1→FM2→AM.
The selected mode will be indicated. If FM stereo is being received, “ST” will be displayed.
NOTE
If the FM broadcast signal becomes weak, reception automatically changes from STEREO to MONO for reduced noise, and the “ST” indicator will go out.
Manual tuning
Turning the manual tuning dial will change the frequency higher or lower.
Seek tuning
Pressing the seek tuning button (

) will cause the tuner to seek a
higher or lower frequency automatically.
NOTE
If you continue to press and hold the seek tuning button (
 ), the frequency will continue changing
without stopping.
Scan tuning
Press the scan button ( ) to automatically
sample strong stations.
Scanning stops at each station for about 5 seconds. To hold a station, press
the scan button ( ) again during this
interval.
Preset channel tuning
The 6 preset channels can be used to store 6 AM and 12 FM stations.
1. To set a channel first select AM, FM1, or FM2. Tune to the desired station.
2. Depress a channel preset button for about 2 seconds until a beep is heard.
The preset channel number or station frequency will be displayed. The station is now held in the memory.
3. Repeat this operation for the other stations and bands you want to store.
To tune one in the memory, select AM, FM1, or FM2 and then press its channel preset button. The station frequency or the channel number will be displayed.
Auto memory tuning
This is especially useful when driving in an area where the local stations are not known.
Press and hold the auto memory button (
) for about 2 seconds until a beep is heard; the system will automatically scan
and temporarily store up to 6 stations with the strongest frequencies in each selected
band in that area.
After scanning is completed, the station with the strongest frequency will be
tuned and its frequency displayed. Press and release the auto memory button (
 ) to recall stations from the auto-stored
stations. One stored station will be selected each time; its frequency and channel
number will be displayed.
NOTE
If no stations can be tuned after scanning operations, “A” will be displayed.
Operating the Compact Disc (CD) Player
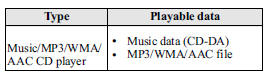
NOTE
If a disc has both music data (CD-DA) and MP3/WMA/AAC files, playback of the two or three file types differs depending on how the disc was recorded.
Inserting the CD
Insert the CD into the slot, label-side up.
The auto-loading mechanism will set the CD and begin play.
NOTE
There will be a short lapse before play begins while the player reads the digital signals on the CD.
Ejecting the CD
Press the CD eject button ( ) to
) to
eject the CD.
Playback
Press the CD play button (  ) to start
play when a CD is in the unit. If a CD is not in the unit when the CD play button
( ) is pressed, “NO DISC” will flash
on and off.
NOTE
When the load button ( ) is pressed,
the CD will load and play.
Fast-forward/Reverse
Press and hold the fast-forward button (
 ) to advance through a track at high
speed. Press and hold the reverse button (
 ) to reverse through a track at high
speed.
Track search
Press the track up button (  ) or
) or
turn the file dial clockwise once to skip forward to the beginning of the next track.
Press the track down button ( ) or
) or
turn the file dial counterclockwise within a few seconds after playback begins to
track down to the beginning of the previous track.
Press the track down button ( ) or
) or
turn the file dial counterclockwise after a few seconds have elapsed to start playback
from the beginning of the current track.
Folder search (during MP3/WMA/AAC CD playback)
To change to the previous folder, press the folder down button (
 ), or press the folder up button (
 ) to advance to the next folder.
Music scan
During music CD playback
This function scans the titles on a CD and plays 10 seconds of each song to aid you in finding a song you want to listen to.
Press the scan button (  ) during
playback to start the scan play operation (the track number will flash). Press the
scan button ( ) again to cancel scan
playback.
During MP3/WMA/AAC CD playback
This function scans the titles in a folder currently being played and plays 10
seconds of each song to aid you in finding a song you want to listen to. Press the
scan button ( ) during playback to start
the scan play operation (the track number will flash).
Press the scan button ( ) again to
cancel scan playback.
NOTE
If the unit is left in scan, normal playback will resume where scan was selected.
Repeat playback
During music CD playback
Press the repeat button (1) during playback to repeat the playback of the current song. “TRACK RPT” is displayed during playback.
Press the repeat button (1) while displaying the “TRACK RPT” to cancel.
During MP3/WMA/AAC CD playback (Track repeat)
Press the repeat button (1) during playback to repeat the playback of the current song. “TRACK RPT” is displayed during playback.
Press the repeat button (1) two times while displaying the “TRACK RPT” to cancel.
(Folder repeat)
Press the repeat button (1) two times during playback to repeat the playback of the current song in the folder. “FOLDER RPT” is displayed during playback.
Press the repeat button (1) while displaying “FOLDER RPT” to cancel.
Random playback
During music CD playback
Press the random button (2) during playback to play the tracks in the CD randomly. “DISC RDM” is displayed during playback.
Press the random button (2) while displaying “DISC RDM” to cancel.
During MP3/WMA/AAC CD playback (Folder random)
Press the random button (2) during playback to play the tracks in the folder randomly. “FOLDER RDM” is displayed during playback.
Press the random button (2) two times while displaying “FOLDER RDM” to cancel.
(CD random)
Press the random button (2) two times during playback to play the songs on the CD randomly. “DISC RDM” is displayed during playback.
Press the random button (2) while displaying “DISC RDM” to cancel.
Switching the display
For files with a file name and other information that have been input, the display
switches between display of the file name and other information each time the text
button (  ) is pressed during playback.
Music CD
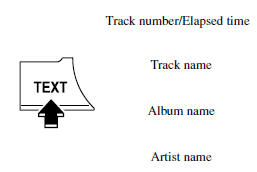
MP3/WMA/AAC CD

NOTE
• The information viewable in the display is only CD information (such as artist name, song title) which has been recorded to the CD.
• This unit cannot display some characters.
Characters which cannot be displayed are indicated by an asterisk (
 ).
).
Display scroll
Only 9 characters (File name) or 13 characters (Except file name) can be displayed
at one time. To display the rest of the characters of a long title, press and hold
the text button ( ). The display scrolls
the next 13 characters. Press and hold the text button (
) again after the last 13 characters have been displayed to return to the beginning
of the title.
NOTE
The number of characters which can be displayed is restricted.
Message display
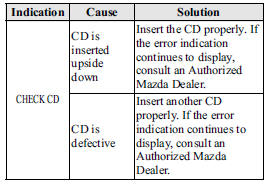
If “CHECK CD” is displayed, it means that there is some CD malfunction. Check the CD for damage, dirt, or smudges, and then properly reinsert. If the message appears again, take the unit to an Authorized Mazda Dealer for service.
How to use Auxiliary jack/USB port
Audio can be heard from the vehicle's speakers by connecting a commerciallyavailable portable audio unit to the auxiliary jack.
Use a commercially-available, nonimpedance (3.5 ) stereo mini plug cable.
Contact an Authorized Mazda Dealer for details.
In addition, audio can be played from the vehicle audio device by connecting USB memory or an iPod to the USB port.
Refer to AUX/USB/iPod mode on .
Error Indications
If you see an error indication on the display, find the cause in the chart. If you cannot clear the error indication, take the vehicle to an Authorized Mazda Dealer.
 Operating Tips for Audio System
WARNING
Always adjust the audio while the vehicle is stopped:
Do not adjust the audio control switches while driving the vehicle.
Adjusting the audio while driving the vehicle is dangerous as it co ...
 Audio Set (Type B)
CAUTION
Do not press the panel strongly or press it with a sharp-pointed object. Otherwise,
the panel could be damaged.
1 Power/Volume/Display/Sound Controls
2 Operating the Radio
3 Operatin ...
Other materials:
Emission System
Purpose, Outline
A single-nano catalyst has been adopted for the under-floor, three-way catalyst
to improve emission gas purification efficiency.
Structural View
Engine compartment side
Exhaust system side
2WD
AWD
Fuel tank side
U.S.A. and CANADA (2WD)
U.S.A. a ...
Intake Air Temperature (Iat) Sensor Inspection
IAT Sensor No.1
Resistance inspection
NOTE:
Because the IAT sensor No.1 is integrated in the MAF sensor, replacing the
IAT sensor No.1 includes replacement of the MAF sensor/IAT sensor No.1.
1. Disconnect the negative battery cable..
2. Disconnect the MAF sensor/IAT sensor No.1 ...
Driveline/Axle Abbreviations
AAS
Active Adaptive Shift
ABS
Antilock Brake System
ABDC
After Bottom Dead Center
ACC
Accessories
AFS
Adaptive Front Lighting System
ALC
...
