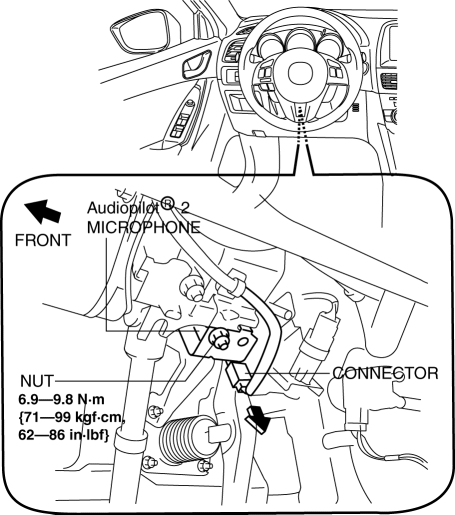
Mazda CX-5 Service & Repair Manual: Audio Pilot®2 Microphone Removal/Installation
NOTE:
-
AudioPilot®2 is a registered trademark of Bose® Corporation.
1. Disconnect the negative battery cable..
2. Remove the following parts:
a. Driver-side front scuff plate.
b. Driver-side front side trim.
c. Switch panel.
d. Decoration panel.
e. Shift lever knob (MTX).
f. Front console box.
g. Shift panel.
h. Upper panel.
i. Rear console.
j. Side wall.
k. Front console.
l. Hood release lever.
m. Driver-side lower panel.
3. Disconnect the connector.
4. Remove the nut.

5. Remove the AudioPilot®2 microphone.
6. Install in the reverse order of removal.
 Audio Amplifier Removal/Installation
1. Disconnect the negative battery cable..
2. Remove the following parts:
a. Front scuff plate (RH).
b. Front side trim (RH).
3. Remove the bolts.
4. Lift up the audio amplifier in the d ...
 Audio System
NOTE:
“iPod” is a registered trademark of Apple Inc. in the United States and other
countries.
Outline
An audio unit compatible with AM/FM tuner and MP3/WMA (Windows Media ...
Other materials:
ABS Wheel Speed Sensor And ABS Sensor Rotor
Purpose/Function
The ABS wheel-speed sensor and ABS sensor rotor detect the rotation condition
of each wheel and transmit this information to the DSC HU/CM.
The signal from the ABS wheel-speed sensor is the primary signal that the
DSC HU/CM uses when carrying out control.
...
Airflow Mode Actuator Inspection [Full Auto Air Conditioner]
CAUTION:
If the lever position exceeds the operation range shown in the figure, the
circuit in the actuator could be damaged. Always perform an actuator operation
inspection with the lever movement within the range shown in the figure.
1. Connect battery positive voltage to airfl ...
Relay And Fuse Block Disassembly/Assembly
1. Insert a tape-wrapped flathead screwdriver into the service hole in the position
shown in the figure.
2. Move the flathead screwdriver in the direction of the arrow (1) shown in the
figure, pull up relay and fuse block No.1 in the direction of the arrow (2) shown
in the figure, and de ...
