Mazda CX-5 Service & Repair Manual: Audio Amplifier Removal/Installation
1. Disconnect the negative battery cable..
2. Remove the following parts:
a. Front scuff plate (RH).
b. Front side trim (RH).
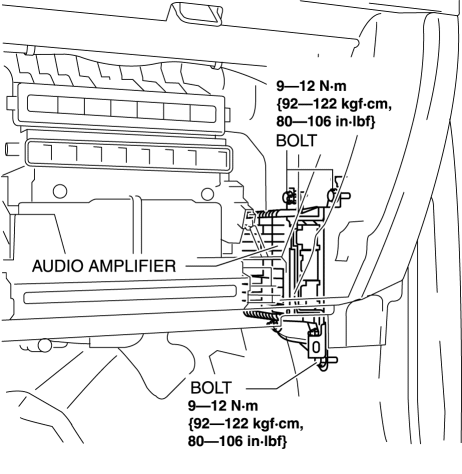
3. Remove the bolts.

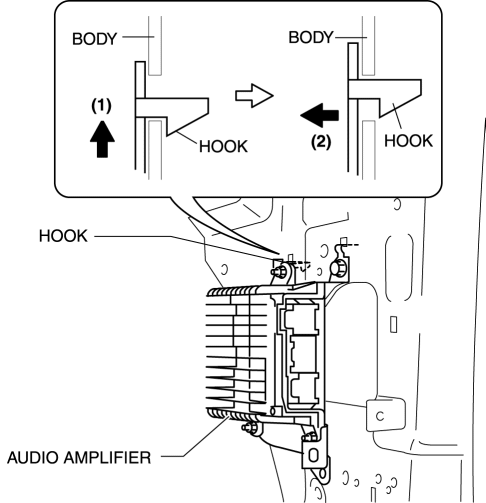
4. Lift up the audio amplifier in the direction of the arrow (1) shown in the figure, pull it in the direction of the arrow (2) shown in the figure, and pull out the audio amplifier hook from the body.

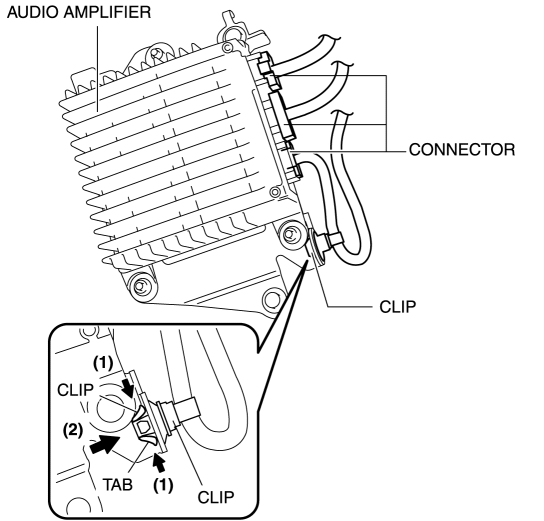
5. Disconnect the connectors.

6. While pressing the clip tabs in the direction of the arrows (1) shown in the figure, press the clip in the direction of the arrow (2) to detach the clip tabs from the audio amplifier.
7. Detach the clip.
8. Remove the audio amplifier.
9. Install in the reverse order of removal.
 Audio Amplifier
Purpose, Function
The audio signal (analog voltage waveform) output from the unit equipped
on the vehicle is converted into a digital pulse. The converted digital pulse
signal is amplifie ...
 Audio Pilot®2 Microphone Removal/Installation
NOTE:
AudioPilot®2 is a registered trademark of Bose® Corporation.
1. Disconnect the negative battery cable..
2. Remove the following parts:
a. Driver-side front scuff plate.
b. ...
Other materials:
Liftgate Removal/Installation
WARNING:
Removing the stay damper, liftgate hinge securing bolt, or liftgate without
supporting the liftgate may cause the liftgate to fall off and injure you. When
removing the stay damper, liftgate hinge, or liftgate, always use two persons
to perform the work.
1. Disconnect ...
Blind Spot Monitoring (Bsm) Control Module Inspection
1. Disconnect the negative battery cable..
2. Remove the rear combination light..
3. Remove the rear bumper..
4. Connect the negative battery cable..
5. Verify that the voltages of each of the terminals are as indicated in the
terminal voltage table (reference).
If the voltage is n ...
Sas Control Module Configuration (Using Read/Write Function) [Standard Deployment
Control System]
NOTE:
When performing configuration, it is necessary to read the vehicle specification
information from the SAS control module before replacing it. Connect the M-MDS
to the vehicle and perform vehicle identification before removing the SAS control
module. The vehicle specification i ...
