Mazda CX-5 Service & Repair Manual: Antenna Feeder No.3 Removal/Installation
1. Disconnect the negative battery cable..
2. Remove the following parts:
a. B-pillar lower trim.
b. Front seat belt adjusting cover.
c. Front seat belt upper anchor installation bolt.
d. B-pillar upper trim.
e. Trunk board.
f. Trunk end trim.
g. Trunk side trim.
h. D-pillar trim.
i. C-pillar trim.
j. Liftgate upper trim (with SIRIUS satellite radio system).
3. Remove the rear passenger's assist handle..
4. Partially peel back the headliner.
NOTE:
-
If the headliner is peeled back excessively, the headliner could become creased. Be careful not to peel back the headliner excessively.
5. Disconnect antenna feeder No.2.
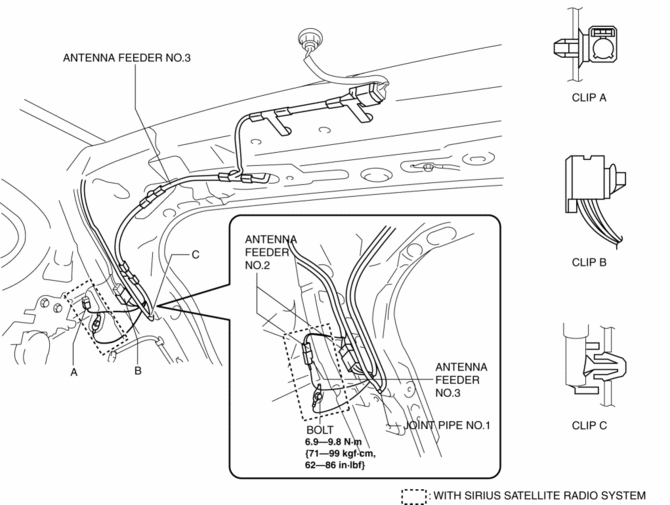
6. Remove the bolt.
7. Remove clips A and B.
8. Remove joint pipe No.1 clip.
9. Remove clips D and E.
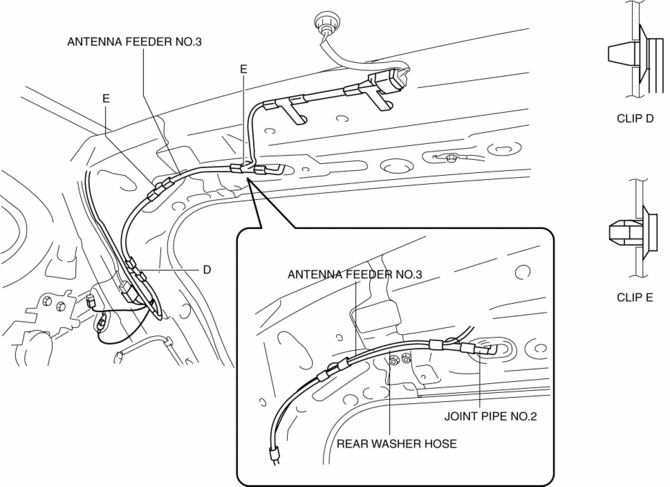
10. Disconnect joint pipe No.2.
11. Remove clips F and G.
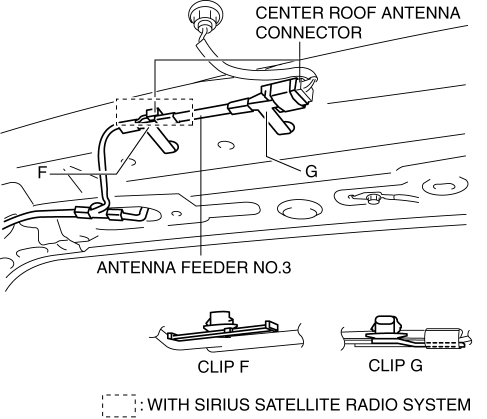
12. Disconnect the center roof antenna.
13. Using a screwdriver wrapped in protective tape, pull the connector in the direction of the arrow (2) shown in the figure while pressing glass antenna terminal in the direction of the arrow (1) shown in the figure, and disengage the glass antenna terminal from the connector. (with SIRIUS satellite radio system)
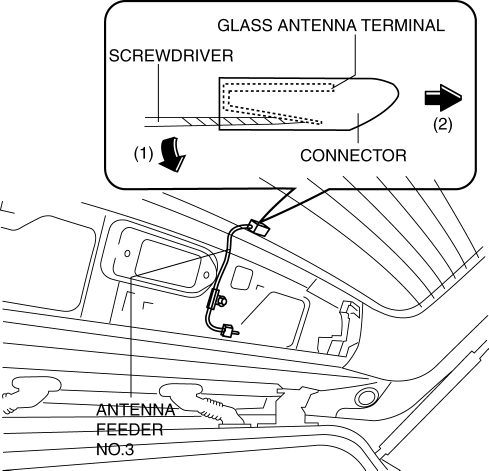
14. Disconnect the connector. (with SIRIUS satellite radio system)
15. Remove the bolt. (with SIRIUS satellite radio system)
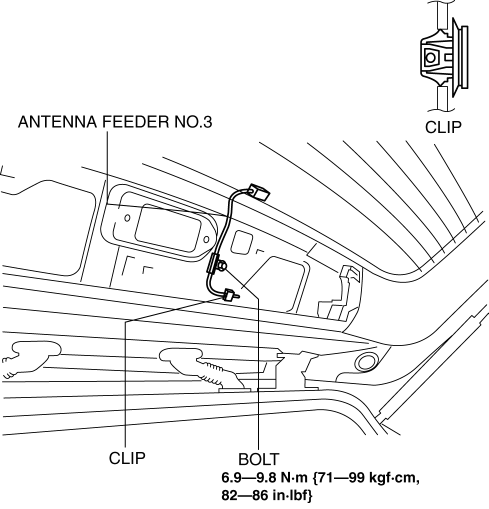
16. Remove the clip. (with SIRIUS satellite radio system)
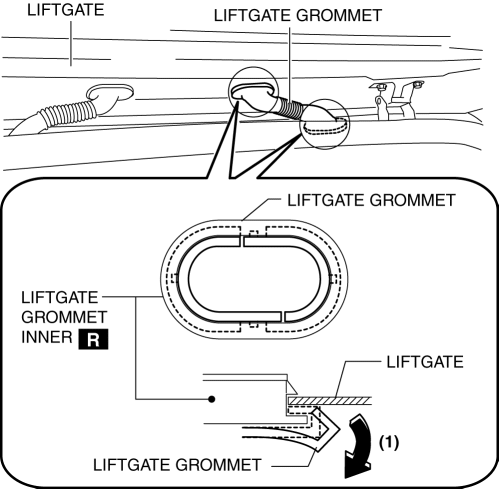
17. Partially peel the liftgate grommet in the direction of arrow (1) shown in the figure, and remove the liftgate grommet from the liftgate grommet inner. (with SIRIUS satellite radio system)
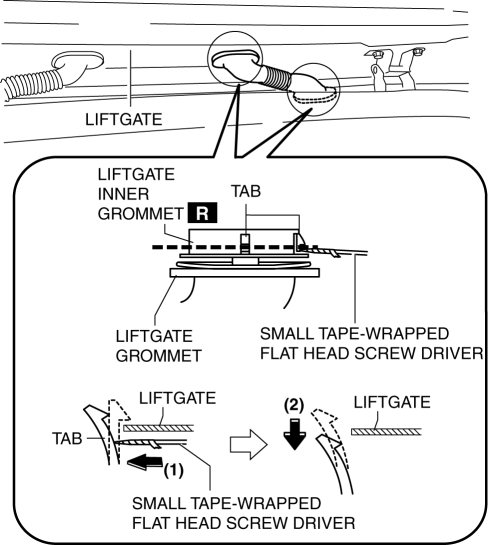
18. Using a screwdriver wrapped in protective tape, pull the liftgate grommet in the direction of the arrow (2) shown in the figure while pressing the liftgate grommet inner tab in the direction of the arrow (1) shown in the figure, and disengage the liftgate from the liftgate grommet. (with SIRIUS satellite radio system)
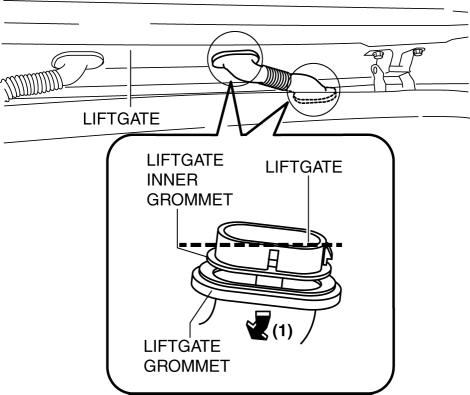
19. Pull the liftgate grommet in the direction of the arrow (1) shown in the figure and remove it.
20. Pull out the disconnected connectors of the liftgate side and vehicle interior side and antenna feeder No.3. (with SIRIUS satellite radio system)
21. Remove antenna feeder No.3.
22. Install in the reverse order of removal.
 Antenna Feeder No.3 Inspection
1. Disconnect the negative battery cable..
2. Remove the following parts:
a. Front scuff plate.
b. Rear scuff plate.
c. B-pillar lower trim.
d. Front seat belt adjusting cover.
e. Front se ...
 Audio Amplifier
Purpose, Function
The audio signal (analog voltage waveform) output from the unit equipped
on the vehicle is converted into a digital pulse. The converted digital pulse
signal is amplifie ...
Other materials:
TCM [Fw6 A EL, Fw6 Ax EL]
Purpose/Function
The TCM detects the vehicle conditions and performs calculations and processing
based on input information from each type of sensor and switch.
Outputs control signals to each solenoid valve so that each type of control
is optimally implemented according to the ...
Forced Ignition On
NOTE:
In order to perform a forced ignition ON, the M-MDS is necessary. If the
servicing is being done outside of an Authorized Mazda dealership, contact an
Authorized Mazda dealership for instructions.
The forced ignition ON procedure forces a power supply to each part when
...
Awd Solenoid Inspection
1. Disconnect the negative battery cable.
2. Disconnect the AWD solenoid connector.
3. Measure resistance between AWD solenoid connector terminals A and B.
If the resistance is not within the specification, replace the coupling unit.
AWD solenoid resistance
2.2—2.7 oh ...
