Mazda CX-5 Service & Repair Manual: Ambient Temperature Display
Purpose
-
The ambient temperature display notifies the user of the ambient temperature.
Function
-
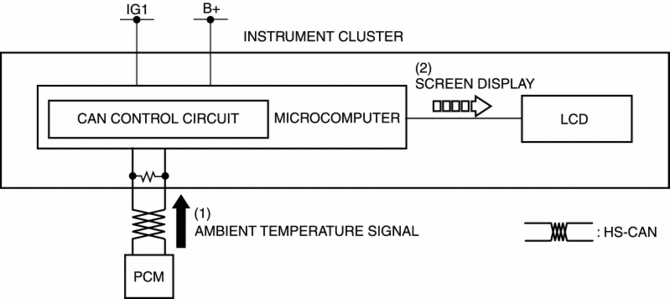
The instrument cluster displays the ambient temperature based on the ambient temperature signal sent from the PCM as a CAN signal.
-
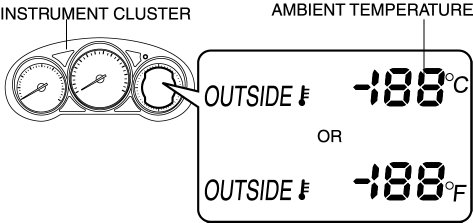
The ambient temperature is displayed between -40—70°C {-40?160°F} If the ambient temperature is -40°C {-40°F} or less, -40°C {-40°F} is displayed, and 70°C {160°F} is displayed if the temperature is 70°C {160°F} or more.
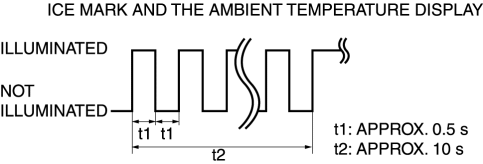
Road ice warning function
-
When the instrument cluster receives an ambient temperature signal of 4°C {39°F} or less from the PCM, it displays the ice mark. After receiving the ambient temperature signal of 4°C {39°F} or more, it flashes the ice mark and the ambient temperature display for about 10 s to warn the user that the road surface may be icy.
-
Once the instrument cluster performs the road ice warning, it will not perform it again until it receives an ambient temperature of 6°C {43°F} or more.
-
The ice mark and ambient temperature flashing pattern is as indicated in the figure.
Ambient temperature display switching function
-
The ambient temperature display can be switched between Celsius and Fahrenheit display. Refer to the workshop manual for the ambient temperature display switching procedure.
Construction
-
The ambient temperature is displayed on the LCD in the instrument cluster.
Operation
1. When the ignition is switched ON, the instrument cluster receives an ambient temperature signal from the PCM (1).
2. Based on the ambient temperature signal, the instrument cluster displays the ambient temperature and ice mark on the LCD.
Fail-safe
-
Function not equipped.
 Gauges
...
 Ambient Temperature Display Switching Procedure
NOTE:
When the ambient temperature display is switched, the set A/C cabin temperature
display is also changed.
...
Other materials:
Cup Holder
WARNING
Never use a cup holder to hold hot liquids while the vehicle is moving:
Using a cup holder to hold hot liquids while the vehicle is moving is dangerous.
If the contents spill, you could be scalded.
Do not put anything other than cups or drink cans in cup holders:
Putting objects other ...
Precaution
Intermittent Concern Troubleshooting
Vibration method
If a malfunction occurs or becomes worse while driving on a rough road or
when the engine is vibrating, perform the following steps.
NOTE:
There are several reasons why vehicle or engine vibration could cause an
electr ...
St 001/12 Special Service Tool Shipment January 2013
APPLICABLE MODEL(S)/VINS
2014 Mazda6
2014 CX-5
DESCRIPTION/PRICING
In support of the new 2014 Mazda6 and the 2014 CX-5, Mazda will ship to all dealers
one (1) new Special Service Tool (SST). The SST will be shipped automatically by
Mazda’s tool vendor, SPX during January 2013.
The followi ...
