Mazda CX-5 Service & Repair Manual: Airflow Temperature Control [Full Auto Air Conditioner]
Purpose
-
The airflow temperature control changes the airflow temperature according to the vehicle conditions.
Function
-
The air mix actuator is driven and the air mix door position is changed according to the set temperature and the vehicle environment.
-
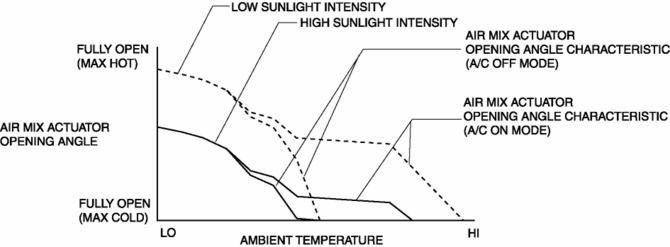
The climate control unit calculates the air mix actuator opening angle characteristic based on the set temperature, solar radiation amount, and airflow mode.
-
The air mix actuator opening angle characteristic is set lower as the sunlight intensity increases.
-
The airflow temperature is automatically controlled continuously.
-
The airflow temperature control performs the following corrections:
-
MAX HOT and MAX COLD correction
-
Engine coolant temperature correction
MAX HOT and MAX COLD correction
-
Under the MAX HOT and MAX COLD correction, the air mix actuator opening angle is fixed at fully open when the temperature is set to 32.0/90
, and fixed at fully closed when the temperature is set to 15/60
.
Engine coolant temperature correction
-
The engine coolant temperature correction prevents cold air from coming out of the air vents after the engine is started in winter.
-
When the engine coolant temperature is lower than the specified value, the air mix actuator opening angle is corrected to the HOT side.
-
The engine coolant temperature correction is not performed when the ambient temperature is 15 °C {59 °F}
or more.
Construction
-
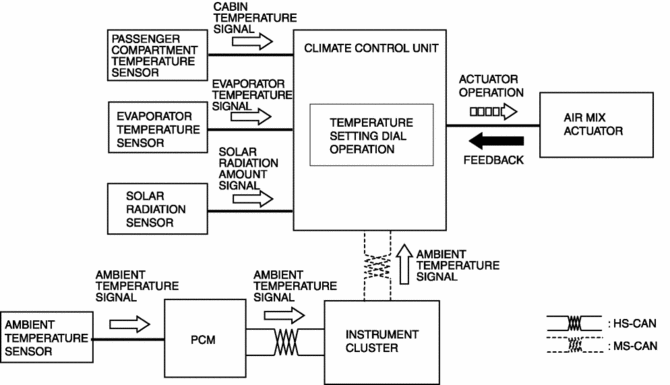
The airflow temperature control consists of the parts indicated in the following table:
|
Input device |
Control part |
Output device |
|
|
|
Operation
1. The climate control unit determines the airflow temperature based on the temperature control dial operation and signals from each sensor which changes according to the vehicle environment.
2. The climate control unit drives the air mix actuator according to the results of the airflow temperature determination and corrections.
 Airflow Mode Control [Full Auto Air Conditioner]
Purpose
The airflow mode control changes the airflow mode according to the vehicle
environment.
Function
The airflow mode control drives the airflow mode actuator according to t ...
 Airflow Volume Control [Full Auto Air Conditioner]
Purpose
The airflow volume control changes the airflow volume according to the vehicle
environment.
Function
The airflow volume control changes the operation of the blower motor ...
Other materials:
Manual Transaxle Oil Inspection [C66 M R]
1. Park the vehicle on level ground.
2. Remove the front under cover No.2..
3. Remove the oil level plug and gasket.
4. Verify that the manual transaxle oil is near the brim of the plug port.
When the manual transaxle oil level is lower than the lower limit, add manual
transaxl ...
Declaration of Conformity
Declaration of Conformity
Keyless Entry System/Immobilizer System
Blind Spot Monitoring (BSM) System
Radiation Hazard
This BSM (blind spot monitoring) device emits intentional electromagnetic radiation
in the 24 GHz to 25 GHz frequency range. The total radiated average power over the
entir ...
Tire Pressure Monitoring System Initialization Procedure
Perform the tire pressure monitoring system initialization when the following
operations have been performed:
Tire pressures have been adjusted
Tires or wheels have been replaced
Tires have been rotated
DSC HU/CM replaced
DSC HU/CM ...
