Mazda CX-5 Service & Repair Manual: Air Mix Actuator Removal/Installation [Full Auto Air Conditioner]
Driver-side
1. Disconnect the negative battery cable..
2. Remove the following parts:
a. Side wall (driver-side).
b. Front heat duct (LH).
3. Disconnect the air mix actuator connector.
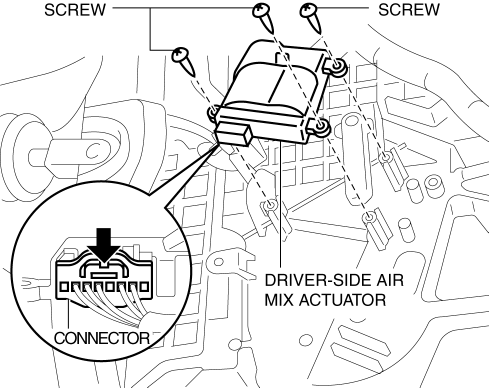
4. Remove the screw.
5. Remove the driver-side air mix actuator.
6. Install in the reverse order of removal.
Passenger-side
1. Disconnect the negative battery cable..
2. Remove the following parts:
a. Dashboard under cover.
b. Glove compartment.
3. Disconnect the air mix actuator connector.
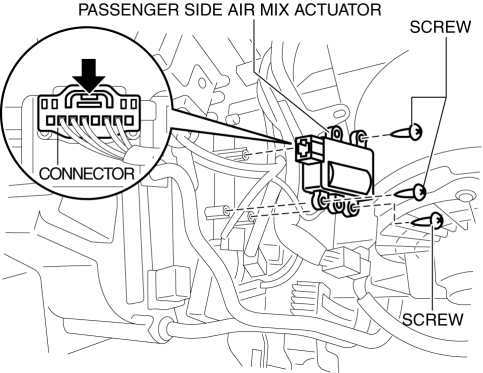
4. Remove the screw.
5. Remove the passenger-side air mix actuator.
6. Install in the reverse order of removal.
 Air Mix Actuator Inspection [Full Auto Air Conditioner]
CAUTION:
If the lever position exceeds the operation range shown in the figure, the
circuit in the actuator could be damaged. Always perform an actuator operation
inspection with the lev ...
 Air Mix Actuator [Full Auto Air Conditioner]
Purpose
The air mix actuator moves the air mix door in the A/C unit to adjust the
temperature of the air blown from the air vent.
Function
Door open/close function
The air mix ...
Other materials:
Camshaft Position (CMP) Sensor Removal/Installation
CAUTION:
When replacing the CMP sensor, make sure there is no foreign material on
it such as metal shavings. If it is installed with foreign material, the sensor
output signal will malfunction resulting from fluctuation in magnetic flux and
cause a deterioration in engine control.
...
Wiper/Washer System
Outline
The following wiper/washer system has been adopted.
Windshield wiper system
Rear wiper system
Auto wiper system (with auto wiper system)
Washer fluid-level sensor (with washer fluid-level sensor)
Specification
Windshiel ...
Liftgate Side Trim Removal/Installation
1. Remove the liftgate upper trim..
2. Remove the fastener A.
3. Take the shaded area shown in the figure, and pull the liftgate side trim
in the direction of the arrow (1) while detaching clips B.
4. Take the shaded area shown in the figure, detach tabs C while pulling the
liftgate si ...
