Mazda CX-5 Service & Repair Manual: Air Intake Actuator [Full Auto Air Conditioner]
Purpose
-
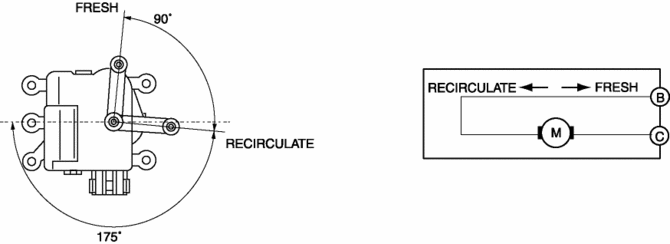
The air intake actuator moves the air intake door in the blower unit to switch the air intake port.
Function
-
The air intake actuator drives the motor based on the signal from the climate control unit and moves the air intake door to the FRESH or REC position.
Construction
-
A mechanical lock type air intake actuator has been adopted.
-
The air intake actuator is installed to the blower unit.
Operation
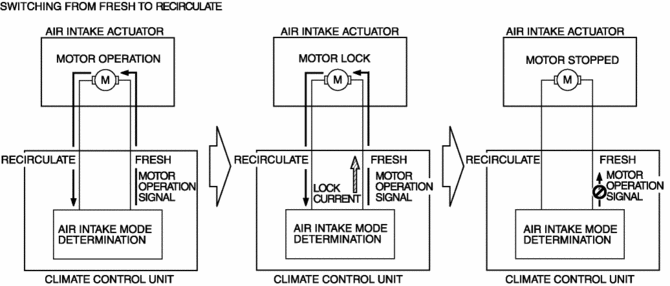
1. The climate control unit outputs a motor drive signal to the air intake actuator based on the air intake mode determined by the air intake control.
2. When the air intake actuator moves to FRESH or REC, the motor locks.
3. When the motor locks and is under excessive load, the current value flowing from the climate control unit increases more than the specification (lock current).
4. When the lock current is detected, the climate control unit stops the motor drive signal to the air intake actuator.
Fail-safe
-
Function not equipped.
 Air Intake Actuator Removal/Installation [Manual Air Conditioner]
1. Disconnect the negative battery cable..
2. Remove the glove compartment..
3. Disconnect the air intake actuator connector.
4. Remove the screw, then remove the air intake actuator.
5. I ...
 Air Intake Actuator [Manual Air Conditioner]
Purpose
The air intake actuator moves the air intake door in the blower unit to switch
the air intake port.
Function
The air intake actuator drives the motor based on the signal ...
Other materials:
Constant Monitoring
The following components of the air bag systems are monitored by a diagnostic
system:
• Crash sensors, and diagnostic module (SAS
unit)
• Front air bag sensors
• Air bag modules
• Side crash sensors
• Air bag/Front seat belt pretensioner system
warning light
• Fron ...
Powertrain System Outline [Fw6 A EL, Fw6 Ax EL]
Outline
The powertrain consists of a 2-piece multi-plate clutch, 3-piece multi-plate
brake, a one-way clutch, and a 3-piece single-type planetary gear.
Construction
Component parts list
Component parts
Movement
Multi-plate clutch
...
Airflow Mode Actuator [Full Auto Air Conditioner]
Purpose
The airflow mode actuator moves the mode door in the A/C unit to switch the
air vent.
Function
Door open/close function
The airflow mode actuator drives the motor based on the signal from the climate
control unit and moves the mode door to the VENT, BI-LEVEL, HEAT, ...
