Mazda CX-5 Service & Repair Manual: Air Fuel Ratio (A/F) Sensor Heater Control
Outline
-
Based on the control of the A/F sensor heater, a stabilized oxygen concentration is detected even at low exhaust temperatures, and feedback control of fuel injection even at cold engine start is made possible for improved cold temperature exhaust emission performance.
-
Both emission performance and sensor protection have been improved by duty control of the heater according to engine operation conditions (exhaust gas temperature).
-
A pre-heater has been adopted to prevent water, produced from the exhaust system when the engine is started, from adhering to the sensor and damaging it.
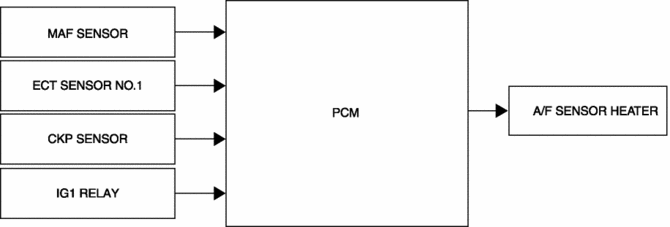
Block Diagram
Operation
Pre-heater control
-
The A/F sensor heater is operated at a duty ratio of approx. 15% within the specified time directly after the engine is started.
Normal control
-
The PCM operates the A/F sensor based on the following control conditions:
|
Output duty ratio |
Control condition |
|
0% |
|
|
0?100% (Duty ratio determined by measuring the element temperature by the A/F sensor heater element impedance) |
|
 Accelerator Pedal Position (App) Sensor
Purpose/Function
Detects the accelerator pedal depression amount as basic information for
mainly determining the throttle valve opening.
Detects the accelerator pedal depression amou ...
 Air Fuel Ratio (A/F) Sensor Inspection
A/F Sensor Inspection
1. Connect the M-MDS to the DLC?2.
2. Switch the ignition ON (engine on).
3. Warm up the engine to normal operating temperature.
4. Access the following PIDs using the M-M ...
Other materials:
Dynamic Stability Control (DSC)
Outline
Electrical brake assist control has been adopted, improving safety.
The DSC HU/CM, integrating both the hydraulic unit (HU) and control module
(CM), has been adopted, resulting in a size and weight reduction.
An enhanced malfunction diagnosis system, used with the M ...
Bsm Indicator Light Does Not Flash While Under Bsm Indicator Light Flashing
Conditions (With Combination Switch Operation (Turn Signal Switch)) [Blind Spot
Monitoring (Bsm)]
Description
BSM indicator light does not flash while under BSM indicator light-flashing
conditions (with combination switch operation (turn signal switch))
The BSM indicator light does not flash or illuminate continuously,
but the cond ...
Energy Absorbing Form Removal/Installation
1. Disconnect the negative battery cable..
2. Remove the seal board upper..
3. Remove the front bumper..
4. Insert the flathead screwdriver shown in the figure, push fasteners A for
back side of front bumper reinforcement arrow shown in the figure.
5. Pull the energy-absorbing form in ...
