Mazda CX-5 Service & Repair Manual: Air Bag Module And Pre Tensioner Seat Belt Deployment Procedures [Standard Deployment Control System]
WARNING:
-
A live (undeployed) air bag module or pre-tensioner seat belt may accidentally operate (deploy) when it is disposed of and cause serious injury. Do not dispose of a live (undeployed) air bag module or pre-tensioner seat belt. If the SSTs (Deployment tool and Adapter harness) are not available, consult the nearest Mazda representative for assistance.
CAUTION:
-
Deploying the air bag modules and pre-tensioner seat belts inside the vehicle may cause damage to the vehicle interior. When the vehicle is not to be scrapped, always deploy the air bag modules and pre-tensioner seat belts outside the vehicle.
-
If the vehicle is to be scrapped, or when disposing of any air bag modules or pre-tensioner seat belts, operate (deploy) them inside the vehicle by following the deployment procedure below and using the SST (Deployment tool)
.
-
When disposing of an operated (deployed) air bag module and pre-tensioner seat belt, refer to “AIR BAG MODULE AND PRE-TENSIONER SEAT BELT DISPOSAL PROCEDURES”.
Deployment Procedure for Inside of Vehicle
1. Inspect the SST (Deployment tool)
..
2. Move the vehicle to an open space, away from strong winds, and close all of the vehicle doors and windows.
3. Switch the ignition to off.
4. Disconnect the negative battery cable and wait for 1 min or more
..
5. Follow the procedure below for operating (deploying) the applicable air bag module or pre-tensioner seat belt.
Driver-side Air Bag Module
1. Remove the driver-side air bag module..
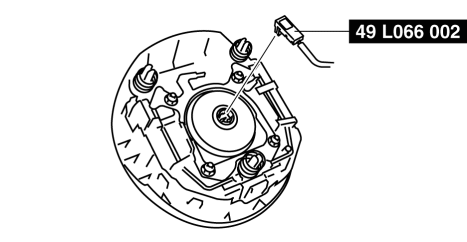
2. Connect the SST (Adapter harness)
to the driver-side air bag module as shown in the figure.
3. Install the driver-side air bag module..
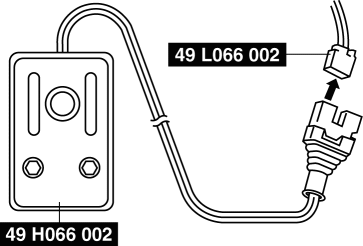
4. Connect the SST (Deployment tool)
to the SST (Adapter harness)
.
5. Connect the SST (Deployment tool)
to the battery. Connect the power supply red clip to the positive battery terminal, and the black clip to the negative battery terminal.
6. Verify that the red lamp on the SST (Deployment tool)
is illuminated.
7. Verify that all persons are standing at least 6 m {20 ft}
away from the vehicle.
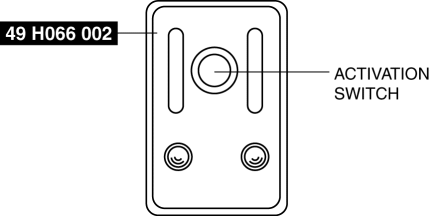
8. Press the activation switch on the SST (Deployment tool)
to operate (deploy) the air bag module.
WARNING:
-
The air bag module is very hot immediately after it is operated (deployed). You can get burned. Do not touch the air bag module for at least 15 min after deployment.
9. Disconnect the SST (Deployment tool)
from the SST (Adapter harness)
.
Passenger-side Air Bag Module
1. Remove the following parts:
a. Front scuff plate (passenger-side).
b. Front side trim (passenger-side).
c. Dashboard under cover.
d. Front heat duct (passenger-side).
e. Glove compartment.
f. Decoration panel.
g. Lower panel (passenger-side).
h. Blower unit.
2. Disconnect the passenger-side air bag module connector..
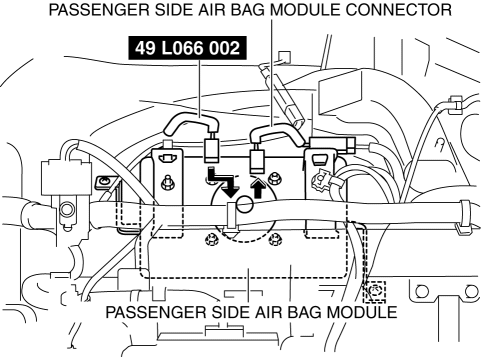
3. Connect the SST (Adapter harness)
to the passenger-side air bag module as shown in the figure.
4. Connect the SST (Deployment tool)
to the SST (Adapter harness)
.

5. Connect the SST (Deployment tool)
to the battery. Connect the power supply red clip to the positive battery terminal, and the black clip to the negative battery terminal.
6. Verify that the red lamp on the SST (Deployment tool)
is illuminated.
7. Verify that all persons are standing at least 6 m {20 ft}
away from the vehicle.
8. Press the activation switch on the SST (Deployment tool)
to operate (deploy) the air bag module.

WARNING:
-
The air bag module is very hot immediately after it is operated (deployed). You can be burned. Do not touch the air bag module for at least 15 min after deployment.
9. Disconnect the SST (Deployment tool)
from the SST (Adapter harness)
.
Side Air Bag Module
1. Disconnect the front seat connector.
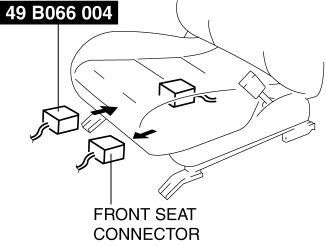
2. Connect the SST (Adapter harness)
to the front seat connector as shown in the figure.
3. Connect the SST (Deployment tool)
to the SST (Adapter harness)
.
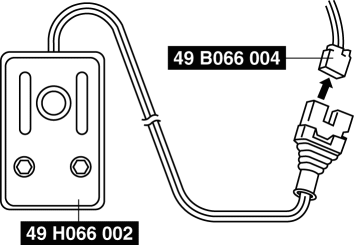
4. Connect the SST (Deployment tool)
to the battery. Connect the power supply red clip to the positive battery terminal, and the black clip to the negative battery terminal.
5. Verify that the red lamp on the SST (Deployment tool)
is illuminated.
6. Verify that all persons are standing at least 6 m {20 ft}
away from the vehicle.
7. Press the activation switch on the SST (Deployment tool)
to operate (deploy) the side air bag module.

WARNING:
-
The air bag module is very hot immediately after it is operated (deployed). You can be burned. Do not touch the air bag module for at least 15 min after deployment.
8. Disconnect the SST (Deployment tool)
from the SST (Adapter harness)
.
Curtain Air Bag Module
1. Remove the following parts:
a. Front scuff plate.
b. Rear scuff plate.
c. B-pillar lower trim.
d. Front seat belt adjuster cover.
e. Upper anchor of the front seat belt.
f. B-pillar upper trim.
g. Assist handle.
h. Trunk board.
i. Trunk end trim.
j. Trunk side trim.
k. D-pillar trim.
l. C-pillar trim.
2. Peel back the headliner.
3. Disconnect the curtain air bag module connector.
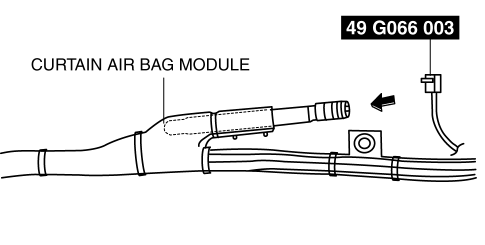
4. Connect the SST (Adapter harness)
to the curtain air bag module as shown in the figure.
5. Connect the SST (Deployment tool)
to the SST (Adapter harness)
.
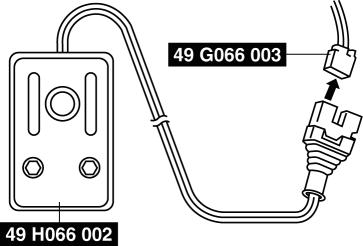
6. Connect the SST (Deployment tool)
to the battery. Connect the power supply red clip to the positive battery terminal, and the black clip to the negative battery terminal.
7. Verify that the red lamp on the SST (Deployment tool)
is illuminated.
8. Verify that all persons are standing at least 6 m {20 ft}
away from the vehicle.
9. Press the activation switch on the SST (Deployment tool)
to operate (deploy) the curtain air bag module.

WARNING:
-
The air bag module is very hot immediately after it is operated (deployed). You can be burned. Do not touch the air bag module for at least 15 min after deployment.
10. Disconnect the SST (Deployment tool)
from the SST (Adapter harness)
.
Pre-tensioner Seat Belt
1. Remove the front scuff plate..
2. Remove the rear scuff plate..
3. Remove the B-pillar lower trim..
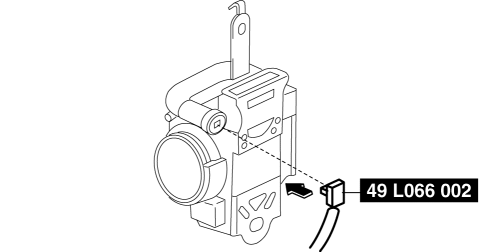
4. Remove the pre-tensioner seat belt and connect the SST (Adapter harness)
as shown in the figure..
5. Install the pre-tensioner seat belt.
6. Connect the SST (Deployment tool)
to the SST (Adapter harness)
.

7. Connect the SST (Deployment tool)
to the battery. Connect the power supply red clip to the positive battery terminal, and the black clip to the negative battery terminal.
8. Verify that the red lamp on the SST (Deployment tool)
is illuminated.
9. Verify that all persons are standing at least 6 m {20 ft}
away from the vehicle.
10. Press the activation switch on the SST (Deployment tool)
to operate (deploy) the pre-tensioner seat belt.

WARNING:
-
The pre-tensioner seat belt is very hot immediately after it is operated (deployed). You can be burned. Do not touch the pre-tensioner seat belt for at least 15 min after deployment.
11. Disconnect the SST (Deployment tool)
from the SST (Adapter harness)
.
Deployment Procedure for Outside of Vehicle
1. Inspect the SST (Deployment tool)
..
2. Switch the ignition to off.
Driver-side Air Bag Module
1. Remove the driver-side air bag module..
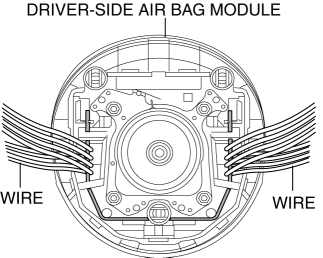
2. Wrap the wiring harness (cross section 1.25 mm2 {0.002 in2} or more
) at least four times around the position shown in the figure for the driver-side air bag module.
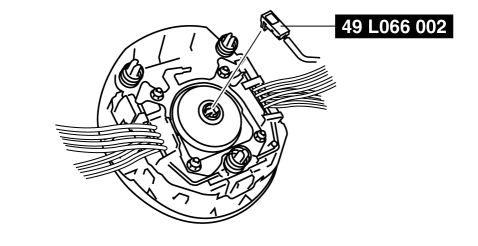
3. Connect the SST (Adapter harness)
to the driver-side air bag module.
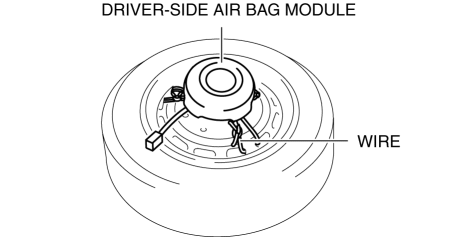
4. Place the driver-side air bag module on the center of the tire wheel with the padded surface facing up. To secure the air bag module to the tire wheel, wrap a wire (cross section 1.25 mm2 {0.002 in2} or more
) through the wheel and the bolt installation holes of the air bag module at least 4 times
.
WARNING:
-
If the air bag module is not properly installed to the tire wheel, serious injury may occur when the module is operated (deployed). When installing the air bag module to the tire wheel, make sure the padded surface is facing up.
5. Stack three tires without wheels on top of the tire with the driver-side air bag module, and then stack another tire with a wheel on the very top.
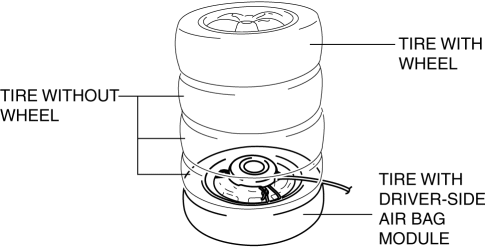
6. Secure the tires with wire.
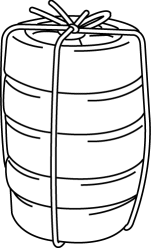
7. Connect the SST (Deployment tool)
to the SST (Adapter harness)
.
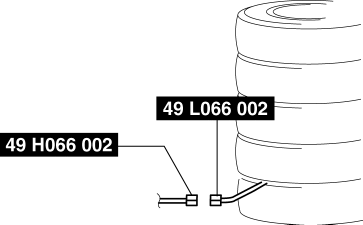
8. Connect the SST (Deployment tool)
to the battery. Connect the power supply red clip to the positive battery terminal, and the black clip to the negative battery terminal.
9. Verify that the red lamp on the SST (Deployment tool)
is illuminated.
10. Verify that all persons are standing at least 6 m {20 ft}
away from the vehicle.
11. Press the activation switch on the SST (Deployment tool)
to operate (deploy) the air bag module.

WARNING:
-
The air bag module is very hot immediately after it is operated (deployed). You can be burned. Do not touch the air bag module for at least 15 min after deployment.
12. Disconnect the SST (Deployment tool)
from the SST (Adapter harness)
.
Passenger-side Air Bag Module
1. Remove the following parts:
a. Front scuff plate (passenger-side).
b. Front side trim (passenger-side).
c. Dashboard under cover.
d. Front heat duct (passenger-side).
e. Glove compartment.
f. Decoration panel.
g. Lower panel (passenger-side).
h. Blower unit.
2. Remove the passenger-side air bag module..
3. Disconnect the passenger-side air bag module connector.
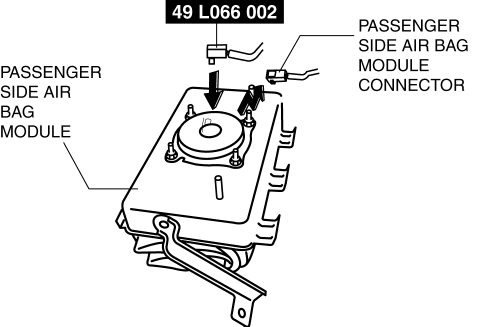
4. Connect the SST (Adapter harness)
to the passenger-side air bag module as shown in the figure.
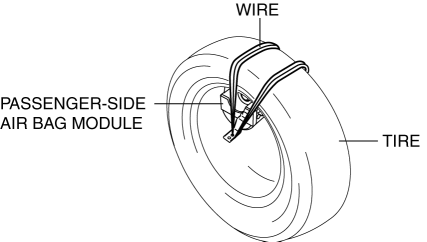
5. Place the padded surface of the passenger-side air bag module facing the center of the tire as shown in the figure. To secure the air bag module to the tire wheel, wrap a wire (cross section 1.25 mm2 {0.002 in2} or more
) through the tire and the bolt installation holes at least 4 times
as shown in the figure.
WARNING:
-
If the air bag module is not properly secured to the tire, the tires may fall over by the impact of operation (deployment) and cause serious injury. To prevent this, secure the air bag module properly with the padded surface facing the center of the tire.
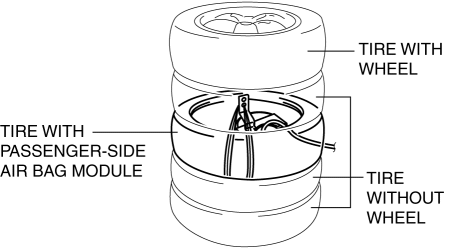
6. Stack the tire with the passenger-side air bag module on top of two tires without wheels. Stack a tire without a wheel on top of the tire with the passenger-side air bag module, and then stack another tire with a wheel on the very top.
7. Secure the tires with wire.

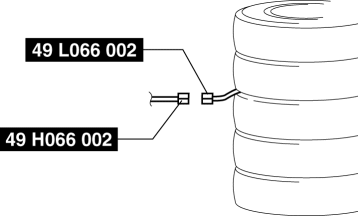
8. Connect the SST (Deployment tool)
to the SST (Adapter harness)
.
9. Connect the SST (Deployment tool)
to the battery. Connect the power supply red clip to the positive battery terminal, and the black clip to the negative battery terminal.
10. Verify that the red lamp on the SST (Deployment tool)
is illuminated.
11. Verify that all persons are standing at least 6 m {20 ft}
away from the vehicle.
12. Press the activation switch on the SST (Deployment tool)
to operate (deploy) the air bag module.

WARNING:
-
The air bag module is very hot immediately after it is operated (deployed). You can be burned. Do not touch the air bag module for at least 15 min after deployment.
13. Disconnect the SST (Deployment tool)
from the SST (Adapter harness)
.
Side Air Bag Module
1. Remove the front seat..
2. Remove the front seat back trim and pad..
3. Remove the side air bag module..
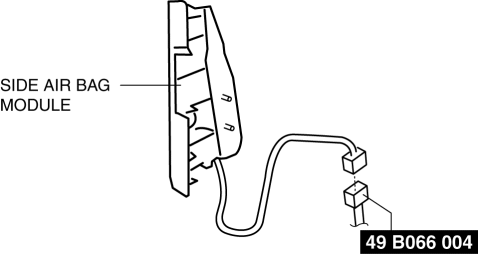
4. Connect the SST (Adapter harness)
to the side air bag module as shown in the figure.
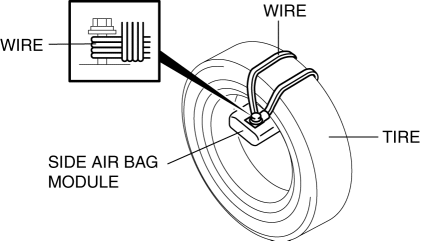
5. Put the side air bag module inside the tire and secure it to the tire by wrapping a wire (cross section of 1.25 mm2 {0.002 in2} or more
) through the tire and the bolt at least 4 times
.
WARNING:
-
If the air bag module is not properly secured to the tire, the tires may fall over by the impact of operation (deployment) and cause serious injury. To prevent this, secure the air bag module properly with the padded surface facing the center of the tire.
6. Stack the tire with the side air bag module on top of two tires without wheels. Stack a tire without a wheel on top of the tire with the side air bag module, and then stack another tire with a wheel on the very top.
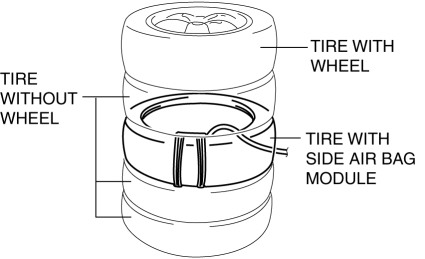
7. Secure the tires with wire.

8. Connect the SST (Deployment tool)
to the SST (Adapter harness).
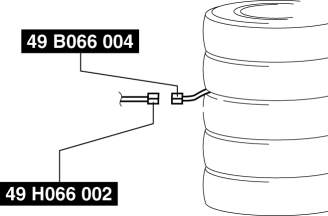
9. Connect the SST (Deployment tool)
to the battery. Connect the power supply red clip to the positive battery terminal, and the black clip to the negative battery terminal.
10. Verify that the red lamp on the SST (Deployment tool)
is illuminated.
11. Verify that all persons are standing at least 6 m {20 ft}
away from the vehicle.
12. Press the activation switch on the SST (Deployment tool)
to operate (deploy) the side air bag module.

WARNING:
-
The air bag module is very hot immediately after it is operated (deployed). You can be burned. Do not touch the air bag module for at least 15 min after deployment.
13. Disconnect the SST (Deployment tool)
from the SST (Adapter harness)
.
Curtain Air Bag Module
1. Disconnect the negative battery cable and wait for 1 min or more
..
2. Partially peel back the seaming welts.
3. Remove the following parts:
a. Sunroof seaming welt (with sunroof).
b. A-pillar trim.
c. Front map light.
d. Sunvisor.
e. Front scuff plate.
f. Rear scuff plate.
g. B-pillar lower trim.
h. Front seat belt adjuster cover.
i. Upper anchor of the front seat belt.
j. B-pillar upper trim.
k. Assist handle.
l. Trunk board.
m. Trunk end trim.
n. Trunk side trim.
o. D-pillar trim.
p. C-pillar trim.
4. Remove the headliner..
5. Remove the curtain air bag module..
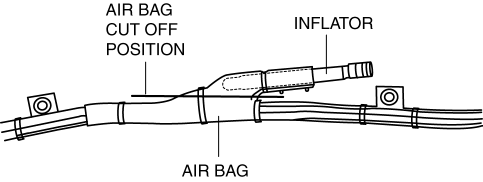
6. Cut off the air bag part of the curtain air bag module at the position shown in the figure.
WARNING:
-
Be sure not to crush the pipe on the side where it is cut. If it is crushed completely, the interior pressure of the pipe will build up and can cause it to explode during air bag module operation (deployment).
7. Disconnect the curtain air bag module connector.
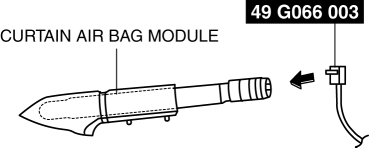
8. Connect the SST (Adapter harness)
to the curtain air bag module as shown in the figure.
9. Secure the curtain air bag module to the tire, by wrapping a wire (cross section 1.25 mm2 {0.002 in2} or more
) through the tire and the bolt installation holes at least 4 times
as shown in the figure.
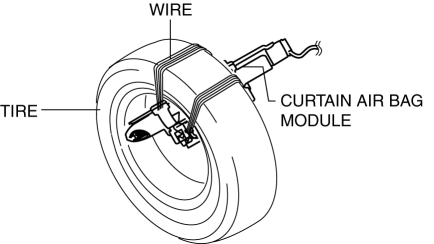
WARNING:
-
If the air bag module is not properly installed to the tire, serious injury may occur when the module is operated (deployed). Make sure to install the air bag module securely.
10. Stack the tire with the curtain air bag module on top of two tires without wheels. Stack a tire without a wheel on top of the tire with the curtain air bag module, and then stack another tire with a wheel on the very top.
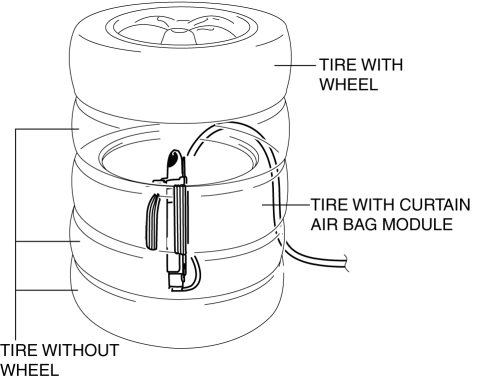
11. Secure the tires with wire.

12. Connect the SST (Deployment tool)
to the SST (Adapter harness)
.
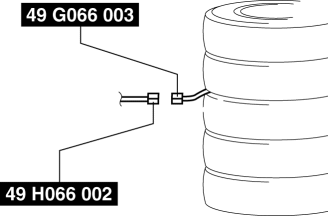
13. Connect the SST (Deployment tool)
to the battery. Connect the power supply red clip to the positive battery terminal, and the black clip to the negative battery terminal.
14. Verify that the red lamp on the SST (Deployment tool)
is illuminated.
15. Verify that all persons are standing at least 6 m {20 ft}
away from the vehicle.
16. Press the activation switch on the SST (Deployment tool)
to operate (deploy) the curtain air bag module.

WARNING:
-
The air bag module is very hot immediately after it is operated (deployed). You can be burned. Do not touch the air bag module for at least 15 min after deployment.
17. Disconnect the SST (Deployment tool)
from the SST (Adapter harness)
.
Pre-tensioner Seat Belt
1. Remove the front scuff plate..
2. Remove the rear scuff plate..
3. Remove the B-pillar lower trim..
4. Remove the pre-tensioner seat belt and connect the SST (Adapter harness)
as shown in the figure..

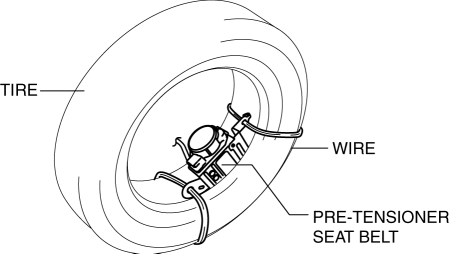
5. Put the pre-tensioner seat belt inside the tire and secure it to the tire by wrapping a wire (cross section of 1.25 mm2 {0.002 in2} or more
) through the tire and the bolt installation holes at least 4 times
.
WARNING:
-
If the pre-tensioner seat belt is not properly installed to the tire, serious injury may occur when the pre-tensioner part is operated (deployed). When installing the pre-tensioner seat belt to the tire, make sure the pre-tensioner part is inside the tire.
6. Stack the tire with the pre-tensioner seat belt on to of two tires without wheels. Stack a tire without a wheel on top of the tire with the pre-tensioner seat belt, and then stack another tire with a wheel on the very top.
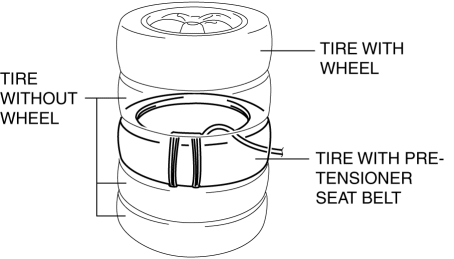
7. Secure the tires with wire.

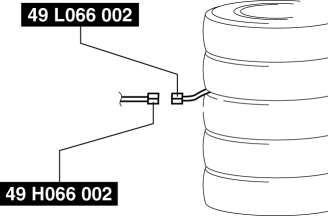
8. Connect the SST (Deployment tool)
to the SST (Adapter harness)
.
9. Connect the SST (Deployment tool)
to the battery. Connect the power supply red clip to the positive battery terminal, and the black clip to the negative battery terminal.
10. Verify that the red lamp on the SST (Deployment tool)
is illuminated.
11. Verify that all persons are standing at least 6 m {20 ft}
away from the vehicle.
12. Press the activation switch on the SST (Deployment tool)
to operate (deploy) the pre-tensioner seat belt.

WARNING:
-
The pre-tensioner seat belt is very hot immediately after it is operated (deployed). You can be burned. Do not touch the pre-tensioner seat belt for at least 15 min after deployment.
13. Disconnect the SST (Deployment tool)
from the SST (Adapter harness)
.
 Accelerator Pedal, Kickdown Switch
Purpose, Function
The driver's intentions are transmitted to the PCM via the accelerator pedal.
Kickdown switch (ATX) (Applied VIN (assumed): JM3 KE2*E*D# 148107?)
If the acce ...
 Air Bag Module And Pre Tensioner Seat Belt Deployment Procedures [Two Step Deployment
Control System]
WARNING:
A live (undeployed) air bag module, pre-tensioner seat belt or lap pre-tensioner
seat belt may accidentally operate (deploy) when it is disposed of and cause
serious injury. Do ...
Other materials:
Front Heat Duct Removal/Installation
1. Disconnect the negative battery cable..
2. Remove the following parts:
a. Dashboard under cover.
b. Side wall.
c. Glove compartment.
3. Detach the tab and remove the front heat duct.
LH
RH
4. Install in the reverse order of removal. ...
Fuel Gauge Sender Unit Removal/Installation [2 Wd]
WARNING:
Always keep sparks and flames away from fuel when servicing the fuel system.
Fuel can be easily ignited which could cause serious injury or death, and damage
to equipment.
Fuel line spills and leakage from the pressurized fuel system are dangerous.
Fuel can ignite a ...
Fully Automatic Type
Climate control information is displayed on the display.
Control Switches
AUTO switch
By pressing the AUTO switch the following functions will be automatically controlled
in accordance with the selected set temperature:
• Airflow temperature
• Amount of airflow
• Selection of airflow ...
