Mazda CX-5 Service & Repair Manual: Accelerator Pedal, Kickdown Switch [Skyactiv G 2.0]
Purpose, Function
-
The driver's intentions are transmitted to the PCM via the accelerator pedal.
-
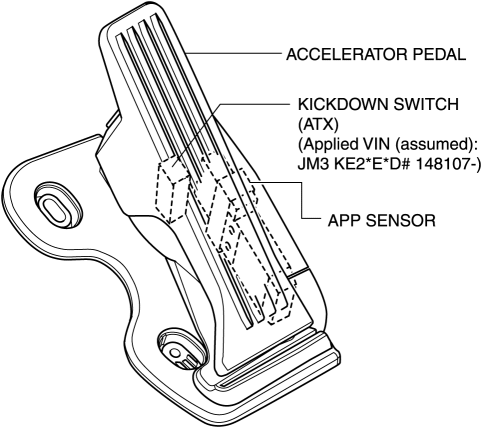
Kickdown switch (ATX) (Applied VIN (assumed): JM3 KE2*E*D# 148107?)
-
If the accelerator pedal is depressed carelessly, kickdown control will be implemented based on the accelerator pedal being determined as fully open, and vehicle shock will occur. A kickdown switch has been adopted so that it can be determined that the accelerator pedal is fully open based on the driver’s intention of depressing the accelerator pedal for kickdown.
Construction
-
The accelerator pedal has a built-in APP sensor and kickdown switch (ATX).
-
For the APP sensor, refer to CONTROL SYSTEM..
Kickdown Switch (ATX) (Applied VIN (assumed): JM3 KE2*E*D# 148107?)
-
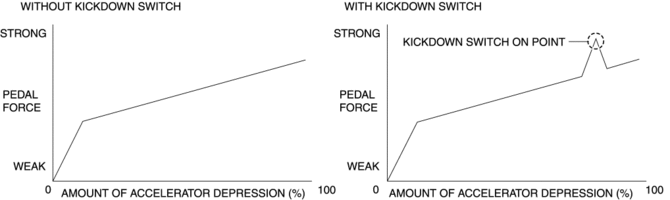
A load can be felt while the accelerator pedal is being depressed and when it is further depressed the kickdown switch turns on.
-
The driver can control the kickdown by knowing the amount of accelerator depression.
-
The kickdown switch is only a measure of the kickdown. An electrical signal is not transmitted by the kickdown switch turning on/off, and vehicle control is not affected.
 ABS Wheel Speed Sensor And ABS Sensor Rotor
Purpose/Function
The ABS wheel-speed sensor and ABS sensor rotor detect the rotation condition
of each wheel and transmit this information to the DSC HU/CM.
The signal from the ABS w ...
 Differential Oil Temperature Sensor
Purpose, Function
The differential oil temperature sensor detects the rear differential oil
temperature based on the resistance of the thermistor, and inputs it to the
AWD CM.
Const ...
Other materials:
Clock Spring Inspection [Two Step Deployment Control System]
1. Disconnect the negative battery cable and wait for 1 min or more..
2. Remove the driver?side air bag module..
3. Remove the steering wheel..
4. Remove the column cover..
5. Remove the clock spring..
6. Verify that the continuity is as indicated in the table.
If not as indicated ...
Fuel Filler Pipe Removal/Installation
WARNING:
Fuel is very flammable liquid. If fuel spills or leaks from the pressurized
fuel system, it will cause serious injury or death and facility breakage. Fuel
can also irritate skin and eyes. To prevent this, always complete the “Fuel
Line Safety Procedure”, while referring ...
Power Brake Unit
Purpose/Function
A 9.8-inch, single diaphragm type power brake unit has been adopted, achieving
compatibility between high braking performance and excellent brake feeling.
Construction
The power brake unit cannot be disassembled. Therefore, if there is any malfunction
in th ...
