Mazda CX-5 Service & Repair Manual: ABS Control
Outline
-
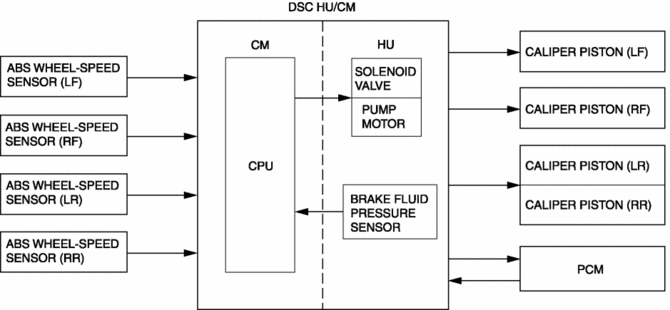
ABS control occurs when wheel slip is determined by the DSC CM (based on the four ABS wheel-speed sensors). Then, the DSC HU inlet and outlet solenoid valves are operated and brake fluid pressure is controlled accordingly to prevent wheel lock-up.
Feature
-
Use of ABS control during emergency braking or on slippery road surfaces allows directional stability to be maintained, steerability ensured, and stopping distance to be reduced.
-
The ABS control system has independent front wheel control and unified control (select low) for the rear wheels.
NOTE:
-
Select low control: A control system in which the left and right vehicle wheel speeds are compared and brake fluid pressure is controlled according to the wheel most likely to lock-up.
-
Construction
Block Diagram
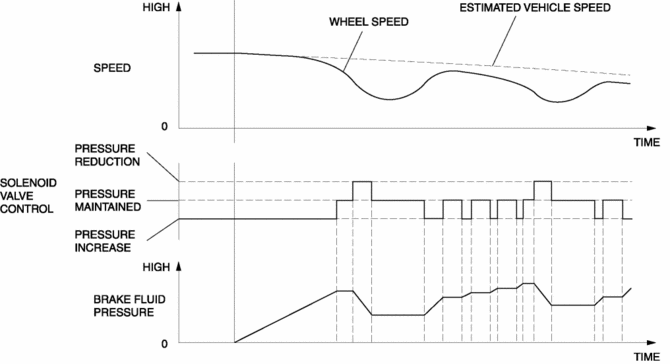
Operation
-
When the DSC CM determines wheel slip conditions based on the signals from the ABS wheel-speed sensors during braking, the DSC CM operates the DSC HU inlet and outlet solenoid valves, reducing and maintaining brake fluid pressure in accordance with the wheel slip factors. Then, when the wheel slip condition has passed, brake fluid pressure is increased and maintained, ensuring braking with a constantly stable brake force.
Control condition transition diagram
 ABS
ABS
...
 ABS Wheel Speed Sensor And ABS Sensor Rotor
Purpose/Function
The ABS wheel-speed sensor and ABS sensor rotor detect the rotation condition
of each wheel and transmit this information to the DSC HU/CM.
The signal from the ABS w ...
Other materials:
Identification Numbers
Vehicle Information Labels
Vehicle Identification Number
The vehicle identification number legally identifies your vehicle. The number
is on a plate attached to the left top side of the dashboard. This plate can easily
be seen through the windshield.
Motor Vehicle Safety Standard Label
...
Door Ajar Warning Light
Purpose
The door-ajar warning light notifies the driver that any door or the liftgate
is open.
Function
When the instrument cluster receives any of the following signals sent from
the rear body control module (RBCM) via the CAN signal, the door-ajar warning
light illumin ...
Neutral Switch
Purpose/Function
Detects the neutral position of the shift lever.
Construction
Installed to the manual transaxle.
An ON/OFF type switch has been adopted.
Operation
Inputs the neutral switch on/off signal to the PCM.
The contact point is on ...
